
[fusion_builder_container background_color=»» background_image=»» background_parallax=»none» enable_mobile=»no» parallax_speed=»0.3″ background_repeat=»no-repeat» background_position=»left top» video_url=»» video_aspect_ratio=»16:9″ video_webm=»» video_mp4=»» video_ogv=»» video_preview_image=»» overlay_color=»» overlay_opacity=»0.5″ video_mute=»yes» video_loop=»yes» fade=»no» border_size=»0px» border_color=»» border_style=»» padding_top=»20″ padding_bottom=»20″ padding_left=»» padding_right=»» hundred_percent=»no» equal_height_columns=»no» hide_on_mobile=»no» menu_anchor=»» class=»» id=»»][fusion_builder_row][fusion_builder_column type=»1_1″ background_position=»left top» background_color=»» border_size=»» border_color=»» border_style=»solid» spacing=»yes» background_image=»» background_repeat=»no-repeat» padding=»» margin_top=»0px» margin_bottom=»0px» class=»» id=»» animation_type=»» animation_speed=»0.3″ animation_direction=»left» hide_on_mobile=»no» center_content=»no» min_height=»none»][fusion_title size=»3″ content_align=»left» style_type=»underline dotted» sep_color=»» margin_top=»» margin_bottom=»» class=»» id=»»]Fusiones por luminosidad[/fusion_title][fusion_text]Podemos realizar fusiones por otro método diferente a los modos de fusión. Simplemente consiste en eliminar de la vista los valores de luminosidad que nosotros deseemos. El cuadro de diálogo que nos permitirá realizar estas fusiones es Opciones de fusión. Podemos acceder a este cuadro de diálogo desde diferentes formas, una de ellas sera hacer doble clic a la derecha del nombre de la capa (en la zona vacía) en la paleta de capas, otra forma sería presionar con el botón derecho sobre cualquier lugar de la capa y en el menú contextual seleccionar “Opciones de fusión”, e incluso dentro del menú desplegable de la paleta de capas también encontramos este comando.[/fusion_text][fusion_text]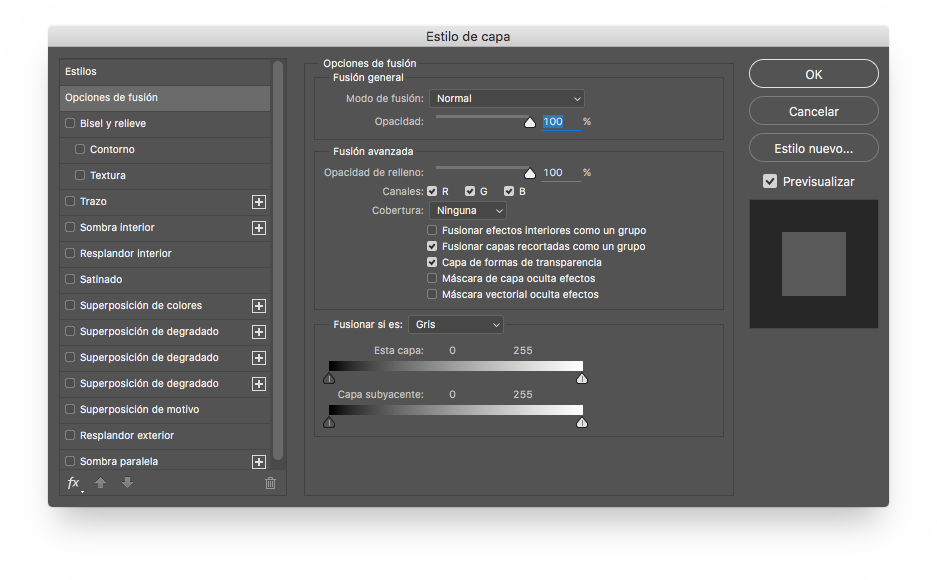 [/fusion_text][/fusion_builder_column][/fusion_builder_row][/fusion_builder_container][fusion_builder_container background_color=»» background_image=»» background_parallax=»none» enable_mobile=»no» parallax_speed=»0.3″ background_repeat=»no-repeat» background_position=»left top» video_url=»» video_aspect_ratio=»16:9″ video_webm=»» video_mp4=»» video_ogv=»» video_preview_image=»» overlay_color=»» overlay_opacity=»0.5″ video_mute=»yes» video_loop=»yes» fade=»no» border_size=»0px» border_color=»» border_style=»» padding_top=»20″ padding_bottom=»20″ padding_left=»» padding_right=»» hundred_percent=»no» equal_height_columns=»no» hide_on_mobile=»no» menu_anchor=»» class=»» id=»»][fusion_builder_row][fusion_builder_column type=»1_1″ background_position=»left top» background_color=»» border_size=»» border_color=»» border_style=»solid» spacing=»yes» background_image=»» background_repeat=»no-repeat» padding=»» margin_top=»0px» margin_bottom=»0px» class=»» id=»» animation_type=»» animation_speed=»0.3″ animation_direction=»left» hide_on_mobile=»no» center_content=»no» min_height=»none»][fusion_text]Este cuadro de diálogo nos permite modificar tanto el modo de fusión como la opacidad o el relleno de la capa activa. Pero nos vamos a centrar en la parte inferior en la que aparece la frase “Fusionar si es:”, en esta zona es donde podemos seleccionar los diferentes niveles de luminosidad que queramos hacer aparecer o desaparecer.[/fusion_text][fusion_text]
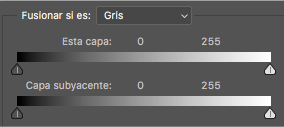 [/fusion_text][/fusion_builder_column][/fusion_builder_row][/fusion_builder_container][fusion_builder_container background_color=»» background_image=»» background_parallax=»none» enable_mobile=»no» parallax_speed=»0.3″ background_repeat=»no-repeat» background_position=»left top» video_url=»» video_aspect_ratio=»16:9″ video_webm=»» video_mp4=»» video_ogv=»» video_preview_image=»» overlay_color=»» overlay_opacity=»0.5″ video_mute=»yes» video_loop=»yes» fade=»no» border_size=»0px» border_color=»» border_style=»» padding_top=»20″ padding_bottom=»20″ padding_left=»» padding_right=»» hundred_percent=»no» equal_height_columns=»no» hide_on_mobile=»no» menu_anchor=»» class=»» id=»»][fusion_builder_row][fusion_builder_column type=»1_1″ background_position=»left top» background_color=»» border_size=»» border_color=»» border_style=»solid» spacing=»yes» background_image=»» background_repeat=»no-repeat» padding=»» margin_top=»0px» margin_bottom=»0px» class=»» id=»» animation_type=»» animation_speed=»0.3″ animation_direction=»left» hide_on_mobile=»no» center_content=»no» min_height=»none»][fusion_text]La dos opciones con las que podemos trabajar son “Esta capa:” o “Capa subyacente:”. Si escogemos “Esta capa” y manipulamos los manejadores, haremos desaparecer los niveles de luminosidad de la imagen del siguiente modo: desde el punto que seleccionemos, hacia la izquierda actuaremos sobre las sombras, y desde el punto que seleccionemos, hacia la derecha lo haremos sobre las luces.
Si escogemos “Capa subyacente” y manipulamos los manejadores, haremos visibles los niveles de luminiosidad de la imagen del siguiente modo: desde el punto seleccionado hacia la izuierda actuaremos sobre las sombras, y desde el punto seleccionado hacia la derecha actuaremos sobre las luces. Podemos verlo en el[/fusion_text][fusion_text]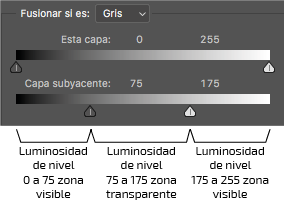 [/fusion_text][/fusion_builder_column][/fusion_builder_row][/fusion_builder_container][fusion_builder_container background_color=»» background_image=»» background_parallax=»none» enable_mobile=»no» parallax_speed=»0.3″ background_repeat=»no-repeat» background_position=»left top» video_url=»» video_aspect_ratio=»16:9″ video_webm=»» video_mp4=»» video_ogv=»» video_preview_image=»» overlay_color=»» overlay_opacity=»0.5″ video_mute=»yes» video_loop=»yes» fade=»no» border_size=»0px» border_color=»» border_style=»» padding_top=»20px» padding_bottom=»20px» padding_left=»0px» padding_right=»0px» hundred_percent=»no» equal_height_columns=»no» hide_on_mobile=»no» menu_anchor=»» class=»» id=»»][fusion_builder_row][fusion_builder_column type=»1_1″ background_position=»left top» background_color=»» border_size=»» border_color=»» border_style=»solid» spacing=»yes» background_image=»» background_repeat=»no-repeat» padding=»» margin_top=»0px» margin_bottom=»0px» class=»» id=»» animation_type=»» animation_speed=»0.3″ animation_direction=»left» hide_on_mobile=»no» center_content=»no» min_height=»none»][fusion_text]Si separamos los manipuladores de los niveles de luminosidad con la tecla de Opción presionada (alt en windows), crearemos zonas de transición que van a suavizar las zonas entre las partes visibles e invisibles, mejorando de esta forma la integración de los elementos.[/fusion_text][fusion_text]
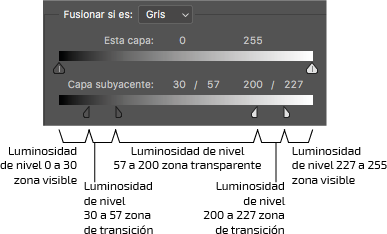 [/fusion_text][/fusion_builder_column][/fusion_builder_row][/fusion_builder_container][fusion_builder_container background_color=»» background_image=»» background_parallax=»none» enable_mobile=»no» parallax_speed=»0.3″ background_repeat=»no-repeat» background_position=»left top» video_url=»» video_aspect_ratio=»16:9″ video_webm=»» video_mp4=»» video_ogv=»» video_preview_image=»» overlay_color=»» overlay_opacity=»0.5″ video_mute=»yes» video_loop=»yes» fade=»no» border_size=»0px» border_color=»» border_style=»» padding_top=»20″ padding_bottom=»20″ padding_left=»» padding_right=»» hundred_percent=»no» equal_height_columns=»no» hide_on_mobile=»no» menu_anchor=»» class=»» id=»»][fusion_builder_row][fusion_builder_column type=»1_3″ last=»no» spacing=»yes» center_content=»no» hide_on_mobile=»no» background_color=»» background_image=»» background_repeat=»no-repeat» background_position=»left top» hover_type=»none» link=»» border_position=»all» border_size=»0px» border_color=»» border_style=»» padding=»» margin_top=»» margin_bottom=»» animation_type=»» animation_direction=»» animation_speed=»0.1″ animation_offset=»» class=»» id=»»][fusion_button link=»http://www.nacholledo.com/2016/09/26/como-funcionan-los-modos-de-fusion-en-photoshop-iv/» color=»custom» size=»large» stretch=»no» type=»flat» shape=»pill» target=»_self» title=»Modos de fusión (II)» gradient_colors=»#c1c1c1|#c1c1c1″ gradient_hover_colors=»#5e5e5e|#5e5e5e» accent_color=»#ffffff» accent_hover_color=»#c1c1c1|» bevel_color=»#c1c1c1|» border_width=»0px» icon=»fa-chevron-left» icon_position=»left» icon_divider=»no» modal=»» animation_type=»0″ animation_direction=»left» animation_speed=»1″ animation_offset=»» alignment=»» class=»» id=»»]Cómo funcionan los modos de fusión en Photoshop (IV)[/fusion_button][/fusion_builder_column][fusion_builder_column type=»1_3″ last=»no» spacing=»yes» center_content=»no» hide_on_mobile=»no» background_color=»» background_image=»» background_repeat=»no-repeat» background_position=»left top» hover_type=»none» link=»» border_position=»all» border_size=»0px» border_color=»» border_style=»» padding=»» margin_top=»» margin_bottom=»» animation_type=»» animation_direction=»» animation_speed=»0.1″ animation_offset=»» class=»» id=»»][/fusion_builder_column][fusion_builder_column type=»1_3″ last=»yes» spacing=»yes» center_content=»no» hide_on_mobile=»no» background_color=»» background_image=»» background_repeat=»no-repeat» background_position=»left top» hover_type=»none» link=»» border_position=»all» border_size=»0px» border_color=»» border_style=»» padding=»» margin_top=»» margin_bottom=»» animation_type=»» animation_direction=»» animation_speed=»0.1″ animation_offset=»» class=»» id=»»][fusion_button link=»http://www.nacholledo.com/2016/10/10/como-funcionan-los-modos-de-fusion-en-photoshop-vi/» color=»custom» size=»large» stretch=»no» type=»flat» shape=»pill» target=»_self» title=»Modos de fusión (II)» gradient_colors=»#c1c1c1|#c1c1c1″ gradient_hover_colors=»#5e5e5e|#5e5e5e» accent_color=»#ffffff» accent_hover_color=»#c1c1c1|» bevel_color=»#c1c1c1|» border_width=»0px» icon=»fa-chevron-right» icon_position=»left» icon_divider=»no» modal=»» animation_type=»0″ animation_direction=»left» animation_speed=»1″ animation_offset=»» alignment=»» class=»» id=»»]Cómo funcionan los modos de fusión en Photoshop (VI)[/fusion_button][/fusion_builder_column][/fusion_builder_row][/fusion_builder_container]


Deja tu comentario